AWS Cloud9 Environment
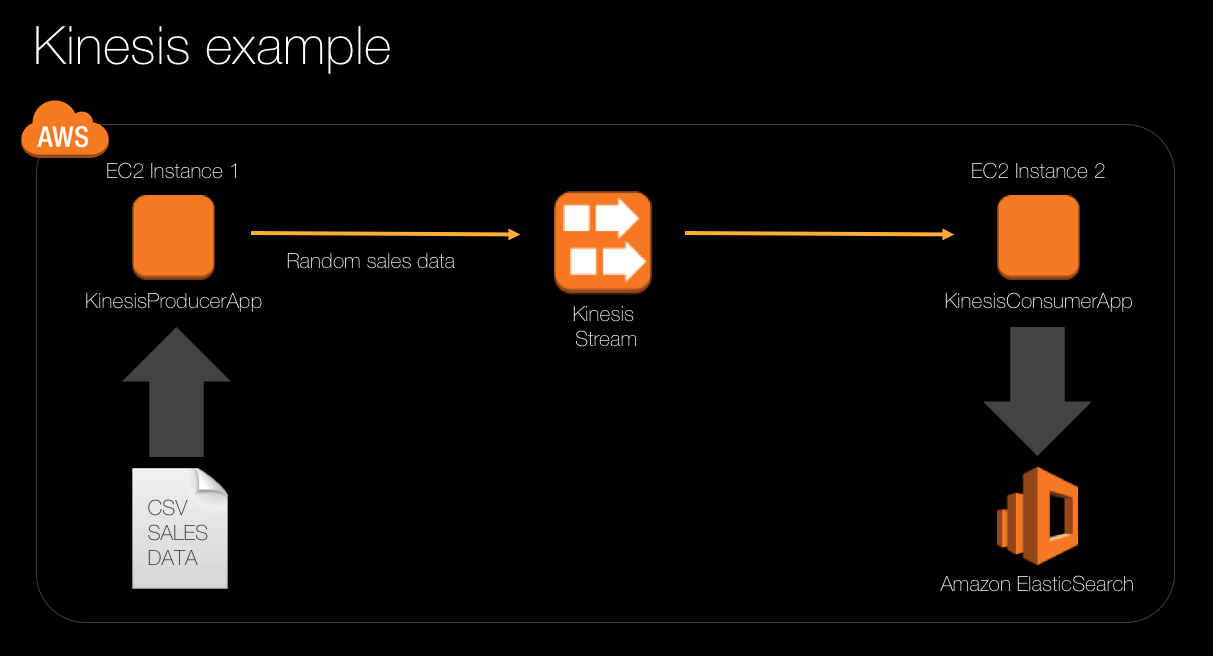
Our example use case simulates sales data coming from the field, and being processed via a Kinesis stream and written out into ElasticSearch where we can analyse the sales data graphically with Kibana. The sales data will be read from a CSV file, and have costs, quantities and transaction dates randomly applied. The architecture looks like this:
Contents
- Clone the repository on the Kinesis Consumer EC2 instance
- Create a new repository for the Kinesis Producer source code
- Curl down the zip file as below and extract it as before, location is here
- Although you can do this on the console, lets do this in the cli:
aws codecommit create-repository --repository-name KinesisConsumer --repository-description "Sample application that consumes messages from a Kinesis stream and writes them to an ElasticSearch domain index."
This will produce the output - keep the following details for the next git config.
{
    "repositoryMetadata": {
        "repositoryName": "KinesisConsumer",
        "cloneUrlSsh": "ssh://git-codecommit.ap-northeast-1.amazonaws.com/v1/repos/KinesisConsumer",
        "lastModifiedDate": 1615766849.351,
        "repositoryDescription": "Sample application that consumes messages from a Kinesis stream and writes them to an ElasticSearch domain index.",
        "cloneUrlHttp": "https://git-codecommit.ap-northeast-1.amazonaws.com/v1/repos/KinesisConsumer",
        "creationDate": 1615766849.351,
        "repositoryId": "1e6d110e-f607-4393-9c39-f7f4c1ba7b38",
        "Arn": "arn:aws:codecommit:ap-northeast-1:XXXXXXXXXX886:KinesisConsumer",
        "accountId": "XXXXXXXXXX886"
    }
}
- Setup your required access for the repo for
aws-student. Git the config details:
Replace the <cloneUrlHttp> with your previously created repository.
git config --global user.name "user name"
git config --global user.email "user name email"
git config --global credential.helper '!aws codecommit credential-helper $@'
git config --global credential.UseHttpPath true
git clone <cloneUrlHttp>
- Add a
readme.mdto confirm it is working:
cd KinesisConsumer
echo "hello" > Readme.md
git add Readme.md
git commit -m 'ee'
git push
This should give you the following output:
Enumerating objects: 3, done.
Counting objects: 100% (3/3), done.
Writing objects: 100% (3/3), 215 bytes | 215.00 KiB/s, done.
Total 3 (delta 0), reused 0 (delta 0)
To https://git-codecommit.ap-northeast-1.amazonaws.com/v1/repos/KinesisConsumer
 * [new branch]      master -> master
- Download the source code bundle from KinesisConsumer.zip and explode the zip file onto your filesystem.
cd ~/environment
curl https://workshops.devax.academy/monoliths-to-microservices/module5/files/KinesisConsumer.zip --output KinesisConsumer.zip
unzip KinesisConsumer.zip
Archive:  KinesisConsumer.zip
  inflating: KinesisConsumer/pom.xml
  inflating: KinesisConsumer/.gitignore
   creating: KinesisConsumer/src/
   creating: KinesisConsumer/src/main/
   creating: KinesisConsumer/src/main/java/
   creating: KinesisConsumer/src/main/java/idevelop/
   creating: KinesisConsumer/src/main/java/idevelop/demo/
  inflating: KinesisConsumer/src/main/java/idevelop/demo/SaleItemTransaction.java
  inflating: KinesisConsumer/src/main/java/idevelop/demo/ResponseHandler.java
  inflating: KinesisConsumer/src/main/java/idevelop/demo/RecordProcessorFactory.java
  inflating: KinesisConsumer/src/main/java/idevelop/demo/KinesisConsumerApp.java
  inflating: KinesisConsumer/src/main/java/idevelop/demo/config.java
  inflating: KinesisConsumer/src/main/java/idevelop/demo/RecordProcessor.java
- In the Cloud9 IDE, open the config.java file.
- Lets change the details in here :
export dets=$(aws cloudformation describe-stacks --query "Stacks[?StackName>'mod'].StackName" --output text)
aws cloudformation describe-stacks --stack-name $dets --query "Stacks[].Outputs[?OutputKey=='ElasticsearchEndpoint'][OutputValue]" --output text
-
Update the value of the
public static final String ELASTICSEARCH_ENDPOINTto match the value in the labs cloudformation output - panel, called ElasticsearchEndpoint. By default, the value is set toREPLACE_WITH_YOUR_ELASTIC_SEARCH_ENDPOINT. Erase this value and replace it with your ElasticsearchEndpoint value. Save the file. -
Verify that the
REGIONis set to the right region. (e.g. change fromap-southeast-2toap-northeast-1) -
Add the new files to the repository by issuing the command:
cd KinesisConsumer
git add .
git status
On branch master
Your branch is up-to-date with 'origin/master'.

Changes to be committed:
  (use "git reset HEAD <file>..." to unstage)

        new file:   .gitignore
        new file:   pom.xml
        new file:   src/main/java/idevelop/demo/KinesisConsumerApp.java
        new file:   src/main/java/idevelop/demo/RecordProcessor.java
        new file:   src/main/java/idevelop/demo/RecordProcessorFactory.java
        new file:   src/main/java/idevelop/demo/ResponseHandler.java
        new file:   src/main/java/idevelop/demo/SaleItemTransaction.java
        new file:   src/main/java/idevelop/demo/config.java
- Commit and push the new files to the branch by issuing the following commands:
git commit -m "Initial commit"
git push
You should see the files that you have added into the repository listed in the browser view.
Clone the repository on the Kinesis Consumer EC2 instance
The labs setup has provisioned an EC2 instance for you to run as the Consumer in this scenario. You will now connect to the EC2 instance, clone the repository, build and run the Consumer code.
In order to securely connect into your cloud infrastructure, you will use SSH, the secure shell. SSH requires a public/private key-pair to be set up and installed on the client and server that will communicate via the SSH protocol. The EC2 instances have been launched with a public key. You need to retrieve the private key so you can use that to establish a secure connection. Click Download PEM. Save this private key file on your local machine. In a terminal session on your local machine, run the following command. This command will ensure you can use the downloaded private key to log into the EC2 instances you will be using.
chmod 400 <path to your downloaded PEM file>
Example:
chmod 400 ~/environment/ec2-keypair.pem
Leave the terminal session open, you will return shortly.
- On the lab guide page, in the Additional Info panel, locate the EC2InstanceKinesisConsumer called
KCL_instancevalue and copy it to your clipboard. - Use the command below as a template to connect to the instance:
ssh -i <path to your downloaded PEM file> ec2-user@<EC2InstanceKinesisConsumer>
Example:
ssh -i ~/environment/ec2-keypair.pem ec2-user@34.212.21.7
- Don’t include the
<and>symbols. - If you have difficulty with this step please seek help from a lab assistant.
- Once you have successfully logged on to the instance via SSH, continue below.
- On the terminal window you used to SSH to the instance, issue the following commands to clone the repository:
git config --global credential.helper '!aws codecommit credential-helper $@'
git config --global credential.UseHttpPath true
git clone https://git-codecommit.ap-northeast-1.amazonaws.com/v1/repos/KinesisConsumer/
You should get this output:
Cloning into 'KinesisConsumer'...
remote: Counting objects: 18, done.
Unpacking objects: 100% (18/18), done.
- The source code you had checked in from your workstation will now be cloned onto the EC2 instance and will take a moment to complete.
- The setup process has installed Maven on the EC2 instance so you can build the source code.
cdinto theKinesisConsumerdirectory and execute this command:
cd KinesisConsumer
/opt/apache-maven-3.3.9/bin/mvn package shade:shade
It will take a few moments to complete the build.
- When the build is complete, start the Kinesis Consumer application by issuing:
java -jar target/KinesisConsumerApp-1.0.0.jar
The application will start and wait for events to be published into the Kinesis stream. You should see no errors, and after a few moments, the console output should show ‘Sleeping…’ since there are no records in the stream to process:
INFO: Initializing record processor for shard: shardId-000000000000
Aug 21, 2017 11:30:19 AM idevelop.demo.RecordProcessor initialize
INFO: Initializing record processor for shard: shardId-000000000001
Aug 21, 2017 11:30:57 AM com.amazonaws.services.kinesis.clientlibrary.lib.worker.Worker info
INFO: Current stream shard assignments: shardId-000000000001, shardId-000000000000
Aug 21, 2017 11:30:57 AM com.amazonaws.services.kinesis.clientlibrary.lib.worker.Worker info
INFO: Sleeping ...
- Stop the execution in the terminal window by issuing
CTRL + C
Create a new repository for the Kinesis Producer source code
You will now repeat the process above, this time, creating a repository for the Kinesis Producer application, and cloning it on to the Kinesis Producer EC2 instance. Once this is complete, you can begin testing data transfer between the two machines, via Amazon Kinesis.
The process of creating the repository is the same as the previous steps, but we repeat it here for convenience.
- Login to the cloud9 IDE again:
aws codecommit create-repository --repository-name KinesisProducer --repository-description "Sample application that publishes sales events into a Kinesis stream."
This will produce the output - keep the following details for the next git config.
{
    "repositoryMetadata": {
        "repositoryName": "KinesisProducer",
        "cloneUrlSsh": "ssh://git-codecommit.ap-northeast-1.amazonaws.com/v1/repos/KinesisProducer",
        "lastModifiedDate": 1615768593.186,
        "repositoryDescription": "Sample application that publishes sales events into a Kinesis stream.",
        "cloneUrlHttp": "https://git-codecommit.ap-northeast-1.amazonaws.com/v1/repos/KinesisProducer",
        "creationDate": 1615768593.186,
        "repositoryId": "b01af616-7e23-4748-918c-f0902783d717",
        "Arn": "arn:aws:codecommit:ap-northeast-1:XXXXXXXXXX86:KinesisProducer",
        "accountId": "XXXXXXXXXX86"
    }
}
- Confirm that the helper class is actioned
git config -l --global
credential.helper=!aws codecommit credential-helper $@
credential.usehttppath=true
- If this is not set - you can action below:
git config --global credential.helper '!aws codecommit credential-helper $@'
git config --global credential.UseHttpPath true
- Clone the repository
git clone https://git-codecommit.ap-northeast-1.amazonaws.com/v1/repos/KinesisProducer
Cloning into 'KinesisProducer'...
warning: You appear to have cloned an empty repository.
Curl down the zip file as below and extract it as before, location is here
- Download the source code bundle from KinesisConsumer.zip and explode the zip file onto your filesystem.
cd ~/environment
curl https://workshops.devax.academy/monoliths-to-microservices/module5/files/KinesisProducer.zip --output KinesisProducer.zip
unzip KinesisProducer.zip
Archive:  KinesisProducer.zip
  inflating: KinesisProducer/pom.xml
  inflating: KinesisProducer/.gitignore
   creating: KinesisProducer/src/
   creating: KinesisProducer/src/main/
   creating: KinesisProducer/src/main/java/
   creating: KinesisProducer/src/main/java/idevelop/
   creating: KinesisProducer/src/main/java/idevelop/demo/
  inflating: KinesisProducer/src/main/java/idevelop/demo/SaleItemTransaction.java
  inflating: KinesisProducer/src/main/java/idevelop/demo/KinesisProducerApp.java
- Add the files into git
cd KinesisProducer
git add .
git commit -m "Initial commit"
git push
Counting objects: 11, done.
Delta compression using up to 2 threads.
Compressing objects: 100% (7/7), done.
Writing objects: 100% (11/11), 4.20 KiB | 4.20 MiB/s, done.
Total 11 (delta 0), reused 0 (delta 0)
To https://git-codecommit.ap-northeast-1.amazonaws.com/v1/repos/KinesisProducer
 * [new branch]      master -> master