Dùng AWS Cloud9
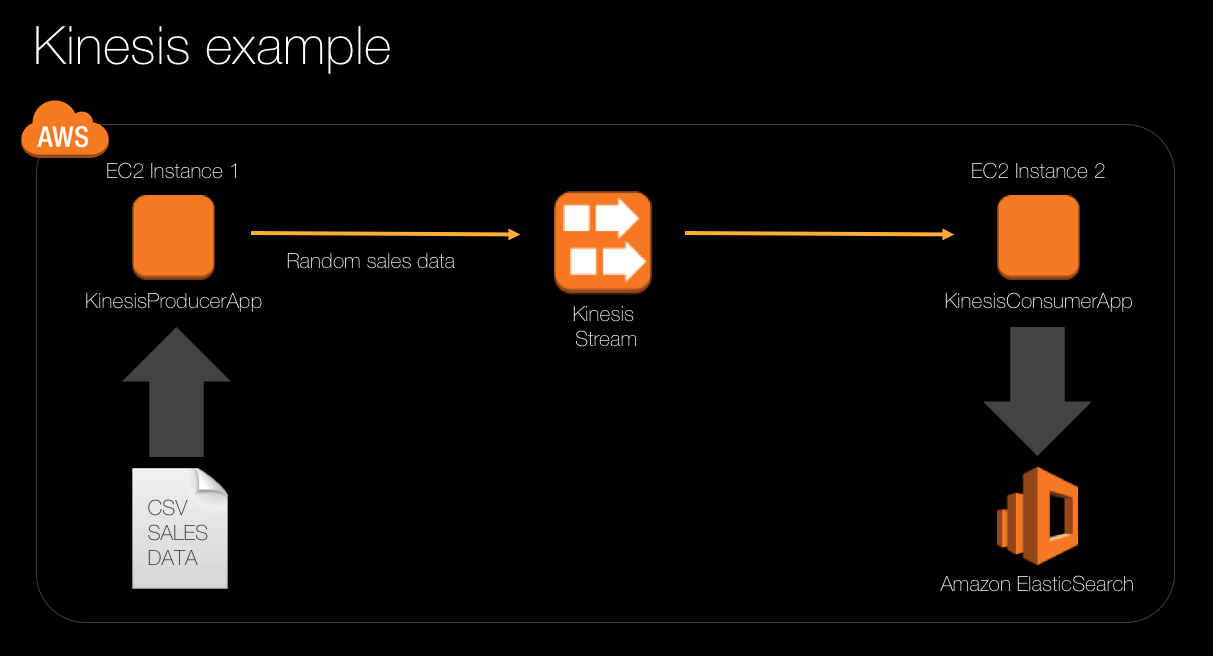
Trường hợp của chúng ta mô phỏng sử dụng mẫu dữ liệu bán hàng thực tế và được xử lý qua Kinesis stream và được ghi vào ElasticSearch nơi chúng ta có thể phân tích dữ liệu bán hàng bằng đồ thị với Kibana. Dữ liệu bán hàng sẽ được đọc từ tệp CSV và có chi phí, số lượng và ngày giao dịch được áp dụng ngẫu nhiên. Kiến trúc trông như thế này:
Nội dung
- Tạo một kho lưu trữ mới cho mã nguồn Kinesis Consumer
- Sao chép kho lưu trữ vào Kinesis Consumer EC2 instance
- Tạo một kho lưu trữ mới cho mã nguồn Kinesis Producer
- Sao chép kho lưu trữ vào Kinesis Producer EC2 instance
Tạo một kho lưu trữ mới cho mã nguồn Kinesis Consumer
- Chúng ta có thể tạo thông qua console, nhưng ở đây hãy thử tạo chúng bằng CLI:
aws codecommit create-repository --repository-name KinesisConsumer --repository-description "Sample application that consumes messages from a Kinesis stream and writes them to an ElasticSearch domain index."
Thông tin trả về sẽ tương tự như sau. Hãy giữ thông tin này để thực hiện cấu hình cho các bước sau:
{
  "repositoryMetadata": {
    "accountId": "XXX",
    "repositoryId": "XXX5",
    "repositoryName": "KinesisConsumer",
    "repositoryDescription": "Sample application that consumes messages from a Kinesis stream and writes them to an ElasticSearch domain index.",
    "lastModifiedDate": 1594016445.471,
    "creationDate": 1594016445.471,
    "cloneUrlHttp": "https://git-codecommit.ap-northeast-1.amazonaws.com/v1/repos/KinesisConsumer",
    "cloneUrlSsh": "ssh://git-codecommit.ap-northeast-1.amazonaws.com/v1/repos/KinesisConsumer",
    "Arn": "arn:aws:codecommit:ap-northeast-1:XXX:KinesisConsumer"
  }
}
- Thiết lập thông tin truy cập cho git với thông tin của
aws-student:
git config --global user.name "user name"
git config --global user.email "user name email"
git config --global credential.helper '!aws codecommit credential-helper $@'
git config --global credential.UseHttpPath true
git clone https://git-codecommit.ap-southeast-1.amazonaws.com/v1/repos/KinesisConsumer
- Thêm tập tin
readme.mdvà xác nhận tập tin vào kho lưu trữ:
cd KinesisConsumer
echo "hello" > Readme.md
git add Readme.md
git commit -m 'ee'
git push
Bạn sẽ được phản hồi tương tự như sau:
Counting objects: 3, done.
Writing objects: 100% (3/3), 212 bytes | 212.00 KiB/s, done.
Total 3 (delta 0), reused 0 (delta 0)
To https://git-codecommit.ap-southeast-1.amazonaws.com/v1/repos/KinesisConsumer
 * [new branch]      master -> master
- Tải gói mã nguồn
KinesisConsumer.zipvà giải nén tại vị trí làm việc trên Cloud9:
cd ~/environment
curl https://workshops.devax.academy/monoliths-to-microservices/module5/files/KinesisConsumer.zip --output KinesisConsumer.zip
unzip KinesisConsumer.zip
Archive: KinesisConsumer.zip
inflating: KinesisConsumer/pom.xml
inflating: KinesisConsumer/.gitignore
creating: KinesisConsumer/src/
creating: KinesisConsumer/src/main/
creating: KinesisConsumer/src/main/java/
creating: KinesisConsumer/src/main/java/idevelop/
creating: KinesisConsumer/src/main/java/idevelop/demo/
inflating: KinesisConsumer/src/main/java/idevelop/demo/SaleItemTransaction.java
inflating: KinesisConsumer/src/main/java/idevelop/demo/ResponseHandler.java
inflating: KinesisConsumer/src/main/java/idevelop/demo/RecordProcessorFactory.java
inflating: KinesisConsumer/src/main/java/idevelop/demo/KinesisConsumerApp.java
inflating: KinesisConsumer/src/main/java/idevelop/demo/config.java
inflating: KinesisConsumer/src/main/java/idevelop/demo/RecordProcessor.java
- Trong Cloud9 IDE, mở tập tin
config.java.
- Lấy thông tin và thay đổi trong tập tin cấu hình thông qua cửa sổ lệnh:
export dets=$(aws cloudformation describe-stacks --query "Stacks[?StackName>'mod'].StackName" --output text)
aws cloudformation describe-stacks --stack-name $dets --query "Stacks[].Outputs[?OutputKey=='ElasticsearchEndpoint'][OutputValue]" --output text
-
Cập nhật giá trị
public static final String ELASTICSEARCH_ENDPOINTtrung với thông tin từ tab Cloudformation Output, gọi đến ElasticsearchEndpoint. Mặc định, giá trị sẽ được thiết lập ở vị tríREPLACE_WITH_YOUR_ELASTIC_SEARCH_ENDPOINT. Xóa và thay thế với giá trị ElasticsearchEndpoint của bạn. Lưu lại tập tin. -
Kiểm tra lại giá trị
REGIONđược thiết lập chính xác hay chưa. (ví dụ: đổi lại từap-northeast-1sangap-southeast-1) -
Thêm các tập tin mới vào kho lưu trữ bằng lệnh:
git add .
git status
On branch master
Your branch is up-to-date with 'origin/master'.

Changes to be committed:
  (use "git reset HEAD <file>..." to unstage)

        new file:   .gitignore
        new file:   pom.xml
        new file:   src/main/java/idevelop/demo/KinesisConsumerApp.java
        new file:   src/main/java/idevelop/demo/RecordProcessor.java
        new file:   src/main/java/idevelop/demo/RecordProcessorFactory.java
        new file:   src/main/java/idevelop/demo/ResponseHandler.java
        new file:   src/main/java/idevelop/demo/SaleItemTransaction.java
        new file:   src/main/java/idevelop/demo/config.java
- Xác nhận các tập tin mới vào branch và đẩy chúng lên kho dữ liệu bằng lệnh sau:
git commit -m "Initial commit"
git push
Bạn sẽ thấy các tập tin mà bạn đã thêm vào kho lưu trữ được liệt kê trong giao diện trình duyệt.
Sao chép kho lưu trữ vào Kinesis Consumer EC2 instance
Trong thiết lập bài thực hành đã cung cấp một EC2 instance để bạn chạy với tư cách Consumer trong tình huống này. Bây giờ bạn sẽ kết nối với EC2 instance, sao chép kho lưu trữ về, build và chạy chương trình Consumer.
Để kết nối an toàn với cơ sở hạ tầng đám mây của bạn, bạn sẽ sử dụng SSH. SSH yêu cầu một cặp public/private key-pair được thiết lập và cài đặt trên máy client và server sẽ giao tiếp thông qua giao thức SSH. Các EC2 instance đã được khởi chạy với một public key. Bạn cần truy xuất private key để có thể sử dụng khóa đó để thiết lập kết nối an toàn.
Hãy đảm bảo bạn đã có key-pair được thiết lập khi triển khai CloudFormation. Lưu tập tin khóa này trên máy của bạn.
Trong một cửa sổ lệnh trên máy của bạn, hãy chạy lệnh sau. Lệnh này sẽ đảm bảo bạn có thể sử dụng keypair đã tải xuống để đăng nhập vào các EC2 instance mà bạn sẽ sử dụng.
chmod 400 <path to your downloaded PEM file>
Ví dụ:
chmod 400 ~/Downloads/ee.pem
Để mở cửa sổ lệnh, bạn sẽ quay lại chúng một chút nữa.
- Trong AWS Console, trang CloudFormation, trong tab Outputs, tìm giá trị EC2InstanceKinesisConsumer và sao chép vào bộ nhớ tạm.
- Sử dụng lệnh mẫu sau để kết nối đến EC2 instance của bạn:
ssh -i <path to your downloaded PEM file> ec2-user@<EC2InstanceKinesisConsumer>
Ví dụ:
ssh -i ~/Downloads/ee.pem ec2-user@34.212.21.7
Đừng thêm vào < và >.Nếu bạn có khó khăn ở bước này, hãy tìm hướng dẫn. Khi đã hoàn thành việc đăng nhập vào instance, tiếp tục các bước bên dưới.
- Ở cửa sổ lệnh bạn SSH vào instance, sử dụng lệnh sau để tải về từ kho dữ liệu của bạn:
git config --global credential.helper '!aws codecommit credential-helper $@'
git config --global credential.UseHttpPath true
git clone https://git-codecommit.ap-southeast-1.amazonaws.com/v1/repos/KinesisConsumer/
Bạn sẽ nhận được phản hồi sau
Cloning into 'KinesisConsumer'...
remote: Counting objects: 18, done.
Unpacking objects: 100% (18/18), done.
- Mã nguồn bạn đã tải lên từ máy trạm của mình bây giờ sẽ được sao chép vào EC2 instance và sẽ mất một chút thời gian để hoàn thành.
- Máy chủ đã được cài đặt Maven nên bạn có thể build mã nguồn ứng dụng.
cdvào thư mụcKinesisConsumervà thực thi lệnh:
/opt/apache-maven-3.3.9/bin/mvn package shade:shade
Sẽ mất một chút thời gian để build mã nguồn ứng dụng.
- Khi quá trình build hoàn tất, chạy ứng dụng Kinesis Consumer bằng lệnh:
java -jar target/KinesisConsumerApp-1.0.0.jar
Ứng dụng sẽ khởi động và chờ các sự kiện được gửi vào Kinesis stream. Bạn sẽ không thấy lỗi nào và sau một lúc, đầu ra của bảng điều khiển sẽ hiển thị Sleeping... vì không có bản ghi nào trong luồng để xử lý:
INFO: Initializing record processor for shard: shardId-000000000000
Aug 21, 2017 11:30:19 AM idevelop.demo.RecordProcessor initialize
INFO: Initializing record processor for shard: shardId-000000000001
Aug 21, 2017 11:30:57 AM com.amazonaws.services.kinesis.clientlibrary.lib.worker.Worker info
INFO: Current stream shard assignments: shardId-000000000001, shardId-000000000000
Aug 21, 2017 11:30:57 AM com.amazonaws.services.kinesis.clientlibrary.lib.worker.Worker info
INFO: Sleeping ...
- Dừng việc thực thi trong cửa sổ lệnh bằng tổ hợp phím
CTRL + C
Tạo một kho lưu trữ mới cho mã nguồn Kinesis Producer
Bây giờ bạn sẽ lặp lại quá trình trên, lần này, tạo một kho lưu trữ cho ứng dụng Kinesis Producer và sao chép chúng vào Kinesis Producer EC2 instance. Sau khi hoàn tất, bạn có thể bắt đầu thử nghiệm truyền dữ liệu giữa hai máy thông qua Amazon Kinesis.
Quá trình tạo kho lưu trữ giống như các bước trước, nhưng chúng ta sẽ lặp lại nó ở đây để tiện theo dõi.
- Truy cập vào Cloud9 IDE:
aws codecommit create-repository --repository-name KinesisProducer --repository-description "Sample application that publishes sales events into a Kinesis stream."
Thông tin trả về sẽ tương tự như sau. Hãy giữ thông tin này để thực hiện cấu hình cho các bước sau:
{
  "repositoryMetadata": {
    "accountId": "XXXX",
    "repositoryId": "86a1e76c-6987-4f6b-8d86-e5cc6273a21d",
    "repositoryName": "KinesisProducer",
    "repositoryDescription": "Sample application that publishes sales events into a Kinesis stream.",
    "lastModifiedDate": 1594080568.124,
    "creationDate": 1594080568.124,
    "cloneUrlHttp": "https://git-codecommit.ap-northeast-1.amazonaws.com/v1/repos/KinesisProducer",
    "cloneUrlSsh": "ssh://git-codecommit.ap-northeast-1.amazonaws.com/v1/repos/KinesisProducer",
    "Arn": "arn:aws:codecommit:ap-northeast-1:XXXXX:KinesisProducer"
  }
}
- Kiểm tra nếu thiết lập helper đã được thực hiện
git config -l --global
credential.helper=!aws codecommit credential-helper $@
credential.usehttppath=true
- Nếu chưa, hãy chạy lệnh sau
git config --global credential.helper '!aws codecommit credential-helper $@'
git config --global credential.UseHttpPath true
- Tải về từ kho lưu trữ
git clone https://git-codecommit.ap-southeast-1.amazonaws.com/v1/repos/KinesisProducer
Cloning into 'KinesisProducer'...
warning: You appear to have cloned an empty repository.
Sao chép kho lưu trữ vào Kinesis Producer EC2 instance
- Tải gói mã nguồn
KinesisProducer.zipvà giải nén tại vị trí làm việc trên Cloud9:
cd ~/environment
curl https://workshops.devax.academy/monoliths-to-microservices/module5/files/KinesisProducer.zip --output KinesisProducer.zip
unzip KinesisProducer.zip
Archive:  KinesisProducer.zip
  inflating: KinesisProducer/pom.xml
  inflating: KinesisProducer/.gitignore
   creating: KinesisProducer/src/
   creating: KinesisProducer/src/main/
   creating: KinesisProducer/src/main/java/
   creating: KinesisProducer/src/main/java/idevelop/
   creating: KinesisProducer/src/main/java/idevelop/demo/
  inflating: KinesisProducer/src/main/java/idevelop/demo/SaleItemTransaction.java
  inflating: KinesisProducer/src/main/java/idevelop/demo/KinesisProducerApp.java
- Thêm các tập tin vào git:
cd KinesisProducer
git add .
git commit -m "Initial commit"
git push
Counting objects: 11, done.
Delta compression using up to 2 threads.
Compressing objects: 100% (7/7), done.
Writing objects: 100% (11/11), 4.20 KiB | 4.20 MiB/s, done.
Total 11 (delta 0), reused 0 (delta 0)
To https://git-codecommit.ap-southeast-1.amazonaws.com/v1/repos/KinesisProducer
 * [new branch]      master -> master